DAQ
How to start the digitizer:
1) Mongo DB: start the database for saving runs
systemctl start mongod
2) Webinterface: run python3 daq_control.py from /home/vulcan/software/webinterface.
3) select configuration file and start run
- outdated stuff below
The Carlton setup uses this amplifier https://www.fastcomtec.com/amp/csp10-charge-sens-preamp
for single SiPMs and a custom multi SiPM board designed at TRIUMF.
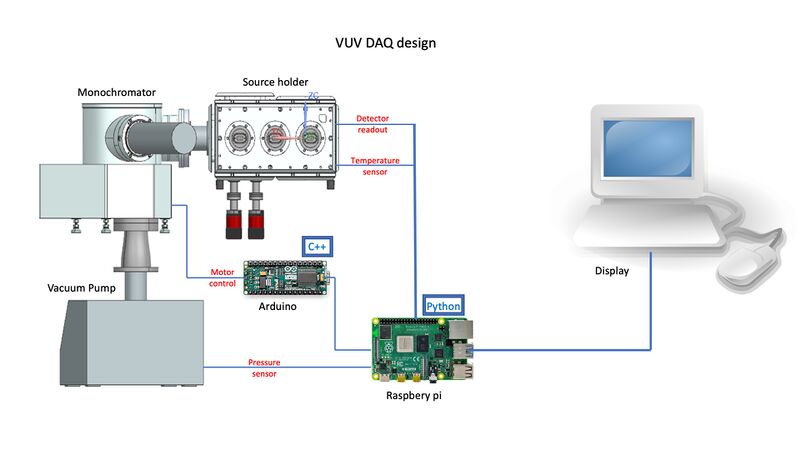
DAQ components (outdated, will be removed at some point in the future):
We will get rid of the arduino and possibly the Raspberry Pi.
==DAQ setup with the new CAEN V1730 digitizer
DAQ setup with the CAEN desktop modules
This section is oriented towards measuring dark counts with a dark box in the office, while we're out of the lab. In general, for operating the DAQ with the CAEN desktop modules in the lab, with the vacuum chamber, the same procedure applies. However, then the vacuum system needs to be taken into account. All supplies for the dark box experiments that have to be conducted in the office have been moved to SP115. The equipment consists of:
- A dark box (this box still needs to made light tight and does not yet have feedthroughs for any cables)
- Two extension cords
- A box containing the SiPMs, both VUV and visible, the peltier element, the casing for the grating, gloves, an optical cable and connection cables
- Two boxes containing mostly power cables and the filter and amplifier boxes
- A power source (bottom) for the peltier element
- A power source (middle) for the amplifier
- A power source (top) for the SiPM bias
- An oscilloscope
- The CAEN desktop digitizer (two units)
- A heat sink for the peltier element (not in the office, get a block of copper or other metal somewhere that fits inside the dark box)
- A desktop (on the floor) with software to talk to the CAEN modules (do not remove the red USB)
Setting up the experiment
- Connect the extension cords to a wall outlet (not to another extension cord!)
- Connect the power sources and the oscilloscope to the extension cords using the cables from the small see-through boxes
- Connect the CAEN modules to eachother with the data cable (sturdy black one) and to the extension cords using their power cords (the ones with the adapters)
- NB. These connections are not very strong, so make sure the cords will stay connected
- Get the filter and amplifier boxes (the silvery ones) and connect the red black and blue wires to the amplifier power source
- Connect the 'out' BNC connector with a wire to the ANALOG IN number 1 port on the CAEN module (or to the oscilloscope or both)
- Connect the 'in' BNC connector side with the SiPM wires (maybe need to make a wire)
- Put the SiPM in the dark box and connect it to the wires (wear gloves and do not touch the front of the SiPM!)
- Connect the pre-amplifier adapter (black cord from the silvery boxes) to the power
- Connect the pre-amplifier and amplifier boxes (connects without an intermediate adaptor or connector)
- Connect the peltier element to the power source and place the element on the heat sink
- Connect all the ground cables to the small bit of metal that is in the bottom small see-through box
- Connect the desktop to the power and to the monitor
- Connect the CAEN module with the USB cord to the desktop
- Check if everything is connected
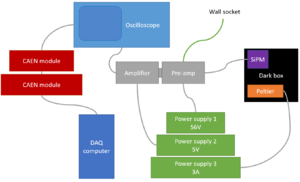
You can find an overview of the assembled setup in figure 1.
Starting up the experiment
NB. Written from memory. It may be incorrect or incomplete. Please correct it where necessary. In case of serious problems contact Emily or Marjolein.
- Turn on the oscilloscope and the desktop
- Turn on the amplifier power source (it needs to be set to 5V), check if you see the signal change on the oscilloscope (you expect amplified noise)
- Turn on the SiPM bias voltage and slowly increase the voltage
- There should not be any current running, if you see any (but really even the tiniest bit) of current when you flip the A/V meter switch, you probably put the SiPM in the wrong way or you have a short somewhere
- Turn the voltage all the way down again
- You will need try the SiPM the other way, if that does not fix it, try to find your short
- Check every now and then if there is still no current
- When you reach ~56V you should see the signal on the oscilloscope change, this is our signal, the basis is now working
- Now turn on the digitizers (they both have a switch), this should not change anything on the oscilloscope, if it does, you did something wrong (try setting the oscilloscope to 1MΩ)
- READ AHEAD NOW UNTIL STEP 9 BEFORE DOING ANYTHING BECAUSE YOU NEED TO BE FAST
- On the desktop, double click the DAQreadout.py file, which should start pycharm, and run it
- You will hear a faint click when the connection to the CAEN module is established
- Stop the DAQreadout.py file (preferably before it starts overwriting the last data file, or run it with dedicated file name (run->run->edit->edit the filename in the run command->run))
- Now start the software that is on the desktop (SciWare or something?), it is in the bottom right corner
- Go to Readout Devices (top, bit to the right of the centre) and in the popup screen click the DT5550 and the connect
- In the screen that pops up when connected, go to oscilloscope->oscilloscope0 and right click to view
- In the screen that pops up now, select channel 1, and set the trigger to free running, press the play button and you should see the digitized signal
- Stop it for a second to check at what level your signal is (probably around 7000), if it is at a different level, you have to change the trigger threshold in the VUVconfig file
- Shut down this software completely (you cannot connect to the DAQ twice) and go back to DAQreadout.py
- In the run->run->edit menu, edit the run command to the number of samples you'd like (1000 (2 min), 5000 (10 min) or 10000 (20 min) depending on the stability of your measurement environment, especially temperature!) and the filename
- The convention is to use in the filename "dc_xxK" for darkcount with temperature or "xxnm_xxK" for the wavelength (not relevant now), then the SiPM type "VUVxxxx" or "VISx" where x is the number of the SiPM, and finally a number indicating the run (just in case you do the same thing multiple times), so you would get something like dc_220K_VUV1821_1.raw or 128nm_100K_VIS1_12.raw.
- Start a run and check if you see data being written to the folder that also contains the DAQreadout.py file
- After the run, move all data to a folder with the date
Troubleshooting
- There is current running when biasing the SiPM
- Check whether you put the SiPM in the correct way (there's a drawing in the logbook!). If that does not help, you probably have a short-circuit somewhere and need to fix this. Are any exposed bits of metal touching? Check the setup systematically with a multimeter until the short is found and repaired.
- The SiPM is biased but I see no signal
- If the noise is really large, the signal may be drowned. Try to reduce the noise: wiggle the cables, see which ones influence the signal and try shielding them. Braid cables, keep them away from touching any electronics or eachother. Removing noise is a subtle art, but touching everything and moving stuff around is usually a good place to start.
- The SiPM may be broken. Check in the lab logbook if you used a SiPM that is listed as broken. There's a list on 15-11-2022.
- The bias voltage may not reach the SiPM at all if the connection is bad. Check the connections and use a multimeter to check the voltage (be careful and do not touch the wires!!)
- The readout SciWare software is not working
- Did you connect the DAQ first using the readoutDAQ.py? You should hear a click, if you did not hear this click, try connecting with the readoutDAQ.py again first.
- Did you stop the readoutDAQ run? You cannot connect both programs to the DAQ at the same time. Stop the run, or just close it all together.
- The readoutDAQ software is not working
- Did you close the SciWare software? Not both of them can be connected to the DAQ at the same time.
- Is it throwing an index error? Just restart, the connection might have been lost for a second and this can cause these errors.
Baseline value in DAQ configuration generator
In the single V1724/V1730 configuration code the digitizer is added in the readout chain. The code for this requires a value for the baseline in the data (baseline_fixed_value). This is calculated as follows:
Baseline value = 2Nref - (2Nref/2N) x ADC
ADC Count = (Vin / Vref) x (2N)
Nref = 16 bit (Standard configuration of digitizer)
N = 14 bit (Resolution V1724/V1730 digitizer)
Vref = 2 V (Reference voltage V1724/V1730 digitizer)
For our configuration:
Baseline value = 2^16 - (4 x ADC)

