FelixInstructions
1) Configure the FELIX card: through the terminal, by connecting to the Nikhef network, use Vivado (GUI) to flash the ITk firmware through tarfa and then reboot the computer hosting your FELIX card through the terminal.
ssh -XY yourNikhefUser@login.nikhef.nl
-- Start a graphical session to any linux computer in the Nikhef network:
ssh -X Tarfa.nikhef.nl
-- Launch Vivado:
source /localstore/et/Xilinx/Vivado/2021.2/settings64.sh
vivado
Flash the firmware through Vivado:
Open Hardware Manager >> Open New Target >> Next (x2) >> Choose Xillinx/00001176835301 or Digilent/210249A85FDE >> Next (x2)
Program Device >> Next (x2) >> /user/aalonso/Downloads/CHOOSE_YOUR_FIRMWARE.bit >> Program
Depending on what you need, you may need a different firmware. Here some of the bit files I have used:
FLX712_STRIPS_4CH_CLKSELECT_GIT_phase2-master_rm-5.0_2342_220414_22_36.bit
FLX712_STRIPS_16CH_CLKSELECT_GIT_phase2-FLXUSERS-569_rm-5.0_2755_221110_16_12.bit
-- Open a new terminal (don’t kill the previous process):
ssh -XY yourNikhefUser@login.nikhef.nl
-- To recognize the PCIe device, reboot the card host computer (canche or srvgst002):
[aalonso@fiora ~]$ ssh -X canche.nikhef.nl
aalonso@canche.nikhef.nl's password:
Last login: Fri Jun 10 11:31:00 2022 from fiora.nikhef.nl
perl: warning: Setting locale failed.
perl: warning: Please check that your locale settings:
LANGUAGE = (unset),
LC_ALL = (unset),
LC_CTYPE = "UTF-8",
LANG = "en_US.UTF-8"
are supported and installed on your system.
perl: warning: Falling back to the standard locale ("C").
-bash-4.2$ sudo shutdown -r now
[sudo] password for aalonso:
Connection to canche.nikhef.nl closed by remote host.
Connection to canche.nikhef.nl closed.
-- Log in the computer hosting the FELIX card again when it gets available again, and execute the following instructions (which in my case are saved under the alias f). NOTE: Once the firmware is already flashed, the previous part doesn't have to be followed again, and connection to FELIX can be done starting with the following instructions:
-bash-4.2$ cd /user/aalonso/felix/felix-distribution/
-bash-4.2$ export REGMAP_VERSION=0x0500
-bash-4.2$ source setup.sh
Setting up FELIX (developer)
- REGMAP: 0x0500
- BINARY_TAG: x86_64-centos7-gcc11-opt
- LCG_FULL_VERSION: 101
- PYTHON: /cvmfs/sft.cern.ch/lcg/releases/LCG_101/Python/3.9.6/x86_64-centos7-gcc11-opt/bin/python
(python_env) -bash-4.2$ cd x86_64-centos7-gcc11-opt/
python_env) -bash-4.2$ export PATH=$PATH:$(pwd)/flxcard:$(pwd)/ftools:$(pwd)/elinkconfig:$(pwd)/felig-tools:$(pwd)/felix-star
-- Open the elink GUI, to configure the lpGBT data for FELIX:
(python_env) -bash-4.2$ elinkconfig
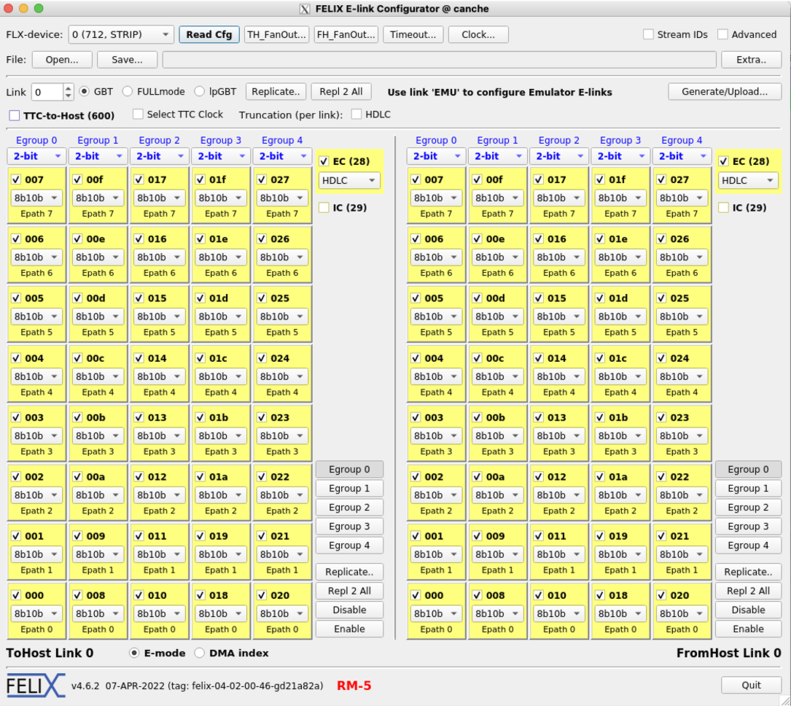
On the top part, FLX-device is the logical device which can be 0 or 1. This is the software interpretation of the two physical links (the two connections on the back side of FELIX) that divides the received info into two equally long parts (physical ones are not divided equally). The configuration can be read through Read Cfg. Two lines below, Link corresponds to what is called channel on the terminal when executing flx-info gbt. In our case, there are 8 channels. The left part of the panel (To Host Link) corresponds to RX (to FELIX) and the right one (From Host Link) is TX (from FELIX). Those elinks that correspond to the HCC in use can be enabled. Those elinks/registers that are not in use should be disabled to avoid log problems. More info in https://twiki.nevis.columbia.edu/twiki/pub/ATLAS/SliceTestboard/felix-user-manual.pdf
In order to get back control of the terminal without killing the panel of the elinkconfigurator, do Control+Z and then execute bg to keep it running in the background.
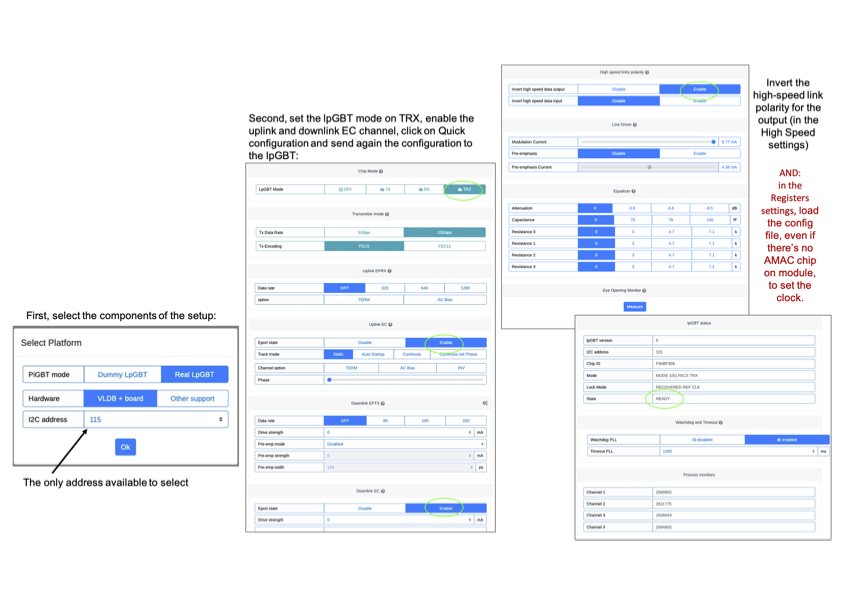
2) To align the links (establish communication in both directions), the lpGBT must be configured too. The raspberry pi connected to the VLDB+ board hosts a web browser to control the lpGBT. Configure the lpGBT: through the PiGBT, connect a monitor and keyboard to the PiGBT, open a browser and enter the web interface of your PiGBT (the one at Nikhef is http://babc-gst-003:8080). Alternatively, an SSH tunnel can be created to view the web page using a local browser.
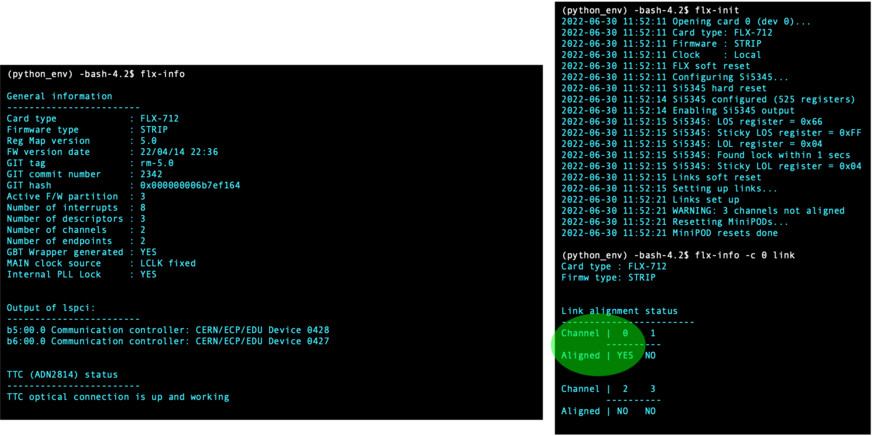
The registers I am using for the lpGBT are the ones being used for the setup in SR1 at CERN. This configuration file is attached at the bottom of this page and I found it in the TWiki of SR1 here: https://twiki.cern.ch/twiki/bin/viewauth/Atlas/DAQloadVLDBplusAtSR1#lpGBT_v1_configuration If everything has been done right, you should get something like this (in my case 1 channel aligned out of 4 in the first version of the setup, and 1 out of 16 when we moved two FELIX cards to the FELIX ITk server that came empty from CERN in November 2022):


