Difference between revisions of "Report"
Jump to navigation
Jump to search
m |
|||
| Line 22: | Line 22: | ||
#Image -> Type -> 8-bit | #Image -> Type -> 8-bit | ||
#Select a square frame around sample | #Select a square frame around sample | ||
| − | #Choose the | + | #Choose the Threshold values for both pictures that result in matching the percentage on analysed light in the pictures as close as possible. All above threshold = 255, all below = 0. |
#Note!!! This threshold includes different percentage of picture light for different pictures. | #Note!!! This threshold includes different percentage of picture light for different pictures. | ||
| − | #Analyze -> Set measurements -> Area | + | #Analyze -> Set measurements -> Area, Mean Gray Value, Integrated Density. |
| + | Area = Total umber of selected pixels. | ||
| + | Mean Gray Value = The average intensity of the selected pixels. | ||
| + | Integrated Density = Sum of the pixel values in the selection (area x mean gray value) | ||
#Frame the region of interest and right click and choose "Measure". | #Frame the region of interest and right click and choose "Measure". | ||
#Results tab should appear. | #Results tab should appear. | ||
| − | #Calculate reduction factor: | + | #Calculate reduction factor using integrated density: Reduction = ((Before−After)/Before)×100% |
| − | Reduction = ((Before−After)/Before)×100% | ||
| Line 38: | Line 40: | ||
*Sample 7: KS115 Isopropanol | *Sample 7: KS115 Isopropanol | ||
| + | |||
| + | [[File:Screenshot 2025-04-01 223213.png|thumb|Sample 7 before]] [[File:Screenshot 2025-04-01 223148.png|thumb|Sample 7after]] | ||
| + | |||
Before: | Before: | ||
- threshold 20 | - threshold 20 | ||
| Line 47: | Line 52: | ||
- area: 152096, mean: 57.270, integrated density: 8710545 | - area: 152096, mean: 57.270, integrated density: 8710545 | ||
| − | + | Reduction = 9.9% | |
| − | |||
Revision as of 20:52, 1 April 2025
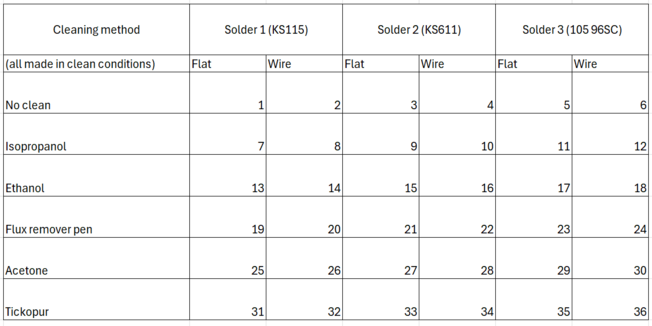
Cleaning and stress tests done to solder flux samples
Cleaning
Each sample was wiped for 30 seconds with the corresponding cleaning agent. In the case Tickopur an ultrasonic bath was used at 30°C temperature for 10 min each step and a rinse in DI water.
Analysis Steps for ImageJ
Steps:
- Open images before & after.
- Image -> Type -> 8-bit
- Select a square frame around sample
- Choose the Threshold values for both pictures that result in matching the percentage on analysed light in the pictures as close as possible. All above threshold = 255, all below = 0.
- Note!!! This threshold includes different percentage of picture light for different pictures.
- Analyze -> Set measurements -> Area, Mean Gray Value, Integrated Density.
Area = Total umber of selected pixels. Mean Gray Value = The average intensity of the selected pixels. Integrated Density = Sum of the pixel values in the selection (area x mean gray value)
- Frame the region of interest and right click and choose "Measure".
- Results tab should appear.
- Calculate reduction factor using integrated density: Reduction = ((Before−After)/Before)×100%
Results of Cleaning
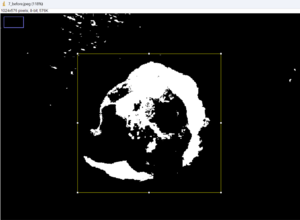
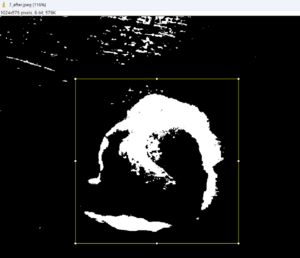
- Sample 7: KS115 Isopropanol
Before:
- threshold 20
- included 6.61% of light histogram
- area: 148996, mean: 64.895, integrated density: 9669090
After:
- threshold 26
- included 6.51% of light histogram
- area: 152096, mean: 57.270, integrated density: 8710545
Reduction = 9.9%


