CTii
Jump to navigation
Jump to search
- Acknowledgment
- This work was carried out in the context of the BiG Grid project, with financial support from the Netherlands Organization for Scientific Research (NWO). The work, described in this document, is developed in collaboration with 3DEM groups at the university of Utrecht (UU) and Leiden University Medical Center (LUMC).
- 1- Introduction
- Cell Tomography Intuitive Interface (CTii) is a Java GUI application which aims at facilitating the tasks of scientists performing the omnimatch 3D template matching experimentations [lebbink 2007 ]. In addition to the main processing component, CTII also provide two other components for pre/post processing of the input/output electro microscopy files. Within the current version of the document, we only focus on the main processing component (3D template matching).
- From the usage point of view, CTII is very sensitive, since it involves the set-up of a number of sensible parameters whose adjustments require appropriate expertise and skill in the application domain.
- 2- Installation
-
- a- Requirements
- CTii is an interface to assist the scientist in setting the proper environment for running and monitoring 3D template matching experiments. It also helps in organizing and classifying the output results. In order to properly, use the CTii interface, the following pre-requirements are needed:
- Omnimatch software must be properly installed and functional. From now on, we will refer to $omnimatch_home as the path to omnimatch software. (Omnimatch software can be downloaded from: ….).
- In order to use the workload management system (Torque), the user must provide a job submission script which, sets up the appropriate environment to run omnimatch and launches the jobs. CTii expects a script file named psb_script_header.sh located under $omnimatch_home. An example that script is given in Annex 1.
- b- Installation
- CTii installer is created using winzip/winrar and can be downloaded from: ….
- To install CTii, you simply need to decompress the installation package 'CTII.rar'. After installation is complete, it will create a new CTii directory with the following structure and items:
- dist: a subdirectory containing the CTii JAR file (CTii.jar)
- dist/lib: a subdirectory containing the different third party libraries used by CTii (jgraph, etc.)
- ctii.bat/ctii.sh: a script to launch CTii Interface for Windows and Unix respectively
- config.xml: descriptions file containing the graphical representation and the description of the omnimatch workflow experiment. This file is only editable through the CTii graphical user interface.
- settings.properties: a property file used to configure CTii. It specifies the remote location on which omnimatch will run and sets up the proper environment to use. This file is only editable through the CTii graphical user interface.
- c- Running CTii
- You can run CTii by issuing the following command:
- Java -jar CTii.jar Or
- CTTI.bat on windows
- CTII.sh on UNIX
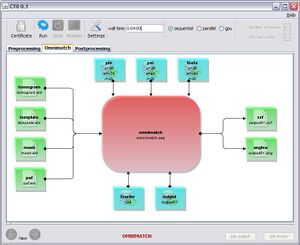
- Figure 1 illustrates the CTii main User Interface, which is composed of: 1) a top-toolbar, 2) a three-tab panel with a central/body area, and 3) a bottom-toolbar.
- 3-Configuration
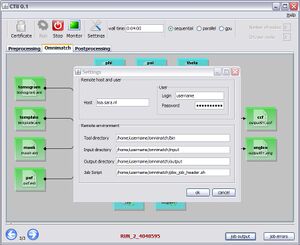
- Most of the CTii configuration is done in the property file 'settings.properties'. This file is read by CTii at startup. It presents the setting information in a graphical interface to be updated and confirmed by the user. This interface is shown in Figure 2. Essentially; the user needs to feed CTii with connection information and working environment on the remote host, where omnimatch software is installed (cluster or grid interface).
- Host Name: specifies the host name of the machine where to launch omnimatch (e.g. lisa.sara.nl).
- User Name: specifies an existing user on the host machine.
- Password: specifies the user password on the host machine.
- Input directory: specifies where omnimatch input files are located.
- Output directory: specifies the base directory where to create output files along with a summary file for each run.
- Job script: specifies the job submission script which, sets up the appropriate environment to run omnimatch and launches the jobs.
- 4- Usage
- As illustrated in figures 1&2, CTii GUI is composed of a top-toolbar, a three-tab panel with a central body, and a bottom-toolbar.
- a- Top-Toolbar icons
- The left part of the top-toolbar is populated with five icons, each providing a specific functionality (see figure 3):
- The certificate icon: allows the user to ask for a certificate granting him/her the right to use the GRID (this functionality is currently disabled),
- The Run icon: allows the user to launch the omnimatch the workflow execution,
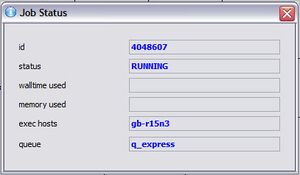
- The Monitor icon: allows the user to monitor the workflow during execution,
- The Stop icon: allows the user to stop the running execution of the workflow,
- The Setting icon: provides the opportunity to update the settings of the remote host, where omnimatch software environment.
- The right part of top-toolbar is populated with five icons, each providing a specific functionality (see figure 4):
- The wall time: input field to specify the maximum time allowed for the jobs to run (hh:mm:ss). If the user does not specify it, a default value of 10 minutes will be considered.
- Mode of execution: input radio button allowing the user to chose from three different execution modes:
- Sequential mode
- Parallel mode using mpi: the user needs to specify the number of nodes and the number of processes per node.
- Parallel mode using GPU, for which you need to specify the number of nodes to be used and the number of CPUs per node (not implemented yet)
- b- Bottom-Toolbar icons
- The bottom-toolbar is populated with two icons, two buttons, and a text field, each providing a specific functionality (see figure 4):
- The left/right arrows: allows the user to navigate among multiple and simultaneous workflow runs.
- The text filed: illustrates the name of the selected (running) instance of the workflow.
- The two buttons: allows the user to browse and visualize the log files related to standard output and standard error for the selected instance, directly fetched from the remote host, where omnimatch software is launched.
- c- Panel Tabs
- CTii panel is populated with three functionality tabs, namely: pre-processing tab, omnimatch tab, and post-processing tab. The omnimatch tab is selected by default and it represents a graph reflecting the omnimatch 3D template matching workflow.
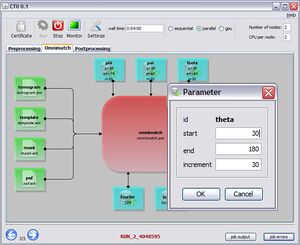
- The experiment workflow consists of the omnimatch module connected with a number of components, each representing an input/output argument along with its current value. Values of the input/output arguments can be changed by double-clicking on each component of the graph. Figure 5 represent a screenshot of changing the value for the 'PSI' argument.
- d- Running omnimatch experiment
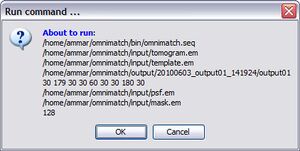
- To launch the workflow execution, you need to click the 'Run' icon on the toolbar. As illustrated on figure 7, CTii will promote the user with an overview on the job be executed and the parameter arguments. The user is therefore, given the opportunity to check the argument values and confirm the job submission.
- After a successful launch, the user is presented with a dialog confirming that "WORKFLOW IS STARTED". 'Stop' and 'Monitor' functionalities are then enabled, giving the user the possibility to monitor or stop the workflow during execution.
- e- Output results
- After a successful completion of the workflow execution, a new subdirectory will be created and three files are generated under that subdirectory.
- Each workflow execution (run) results in a new subdirectory named as __. For example, subdirectory 20100219_output01_150211 means that workflow is being executed on the 19th of February 2010 at 15:02:11.
- In addition to the two files generated by the template matching process (.ang and .ccf), CTII generates an XML file describing the workflow process and the used argument values per run. An example of the experiment description is given in annex 2.


