Difference between revisions of "BeeHub/Step 2: Mounting BeeHub"
| (11 intermediate revisions by the same user not shown) | |||
| Line 14: | Line 14: | ||
3. Click on "Add a Network Location" | 3. Click on "Add a Network Location" | ||
| − | 4. Continue XP build-in client to #3 | + | 4. Continue XP build-in client (below) to #3 |
== XP build-in client and below == | == XP build-in client and below == | ||
| Line 72: | Line 72: | ||
== wdfs (a [[wikipedia:Filesystem_in_Userspace|FUSE]] plugin) == | == wdfs (a [[wikipedia:Filesystem_in_Userspace|FUSE]] plugin) == | ||
Mounting WebDAV filesystems (using wdfs) | Mounting WebDAV filesystems (using wdfs) | ||
| − | |||
| − | |||
| − | |||
| − | |||
All the steps must be done as root. | All the steps must be done as root. | ||
| Line 81: | Line 77: | ||
Firstly make sure you have the FUSE (Filesystem in Userspace) files installed, this is simple using yum: | Firstly make sure you have the FUSE (Filesystem in Userspace) files installed, this is simple using yum: | ||
| − | # yum install fuse | + | # yum install fuse |
Next we need to install the wdfs rpm package: | Next we need to install the wdfs rpm package: | ||
| − | # yum install wdfs | + | # yum install wdfs |
Next create the mount point: | Next create the mount point: | ||
| − | # mkdir /mnt/webdav | + | # mkdir /mnt/webdav |
| Line 100: | Line 96: | ||
usage: | usage: | ||
$ mkdir ~/mountpoint | $ mkdir ~/mountpoint | ||
| − | $ wdfs http[s]:// | + | $ wdfs http[s]://webdav.sara.nl[:443][/directory/] ~/mountpoint [options] |
$ wdfs -h # prints wdfs and fuse options | $ wdfs -h # prints wdfs and fuse options | ||
| − | So following this the following command mounts the file system: | + | So following this the following command mounts the file system (username=<username>@<domain>.nl): |
| − | # wdfs http[s]:// | + | # wdfs http[s]://webdav.sara.nl/ /mnt/webdav -o username=******,password=******,allow_other |
| Line 119: | Line 115: | ||
This is achieved by adding the following line to your /etc/fstab file as root (all on one line): | This is achieved by adding the following line to your /etc/fstab file as root (all on one line): | ||
| − | wdfs#http[s]:// | + | wdfs#http[s]://webdav.sara.nl/ /mnt/webdav fuse allow_other,uid=0,gid=500,nonempty,username=******,umask=007,locking=simple,noauto |
| Line 128: | Line 124: | ||
To mount the system is now just like any other. | To mount the system is now just like any other. | ||
| − | # mount /mnt/webdav | + | # mount /mnt/webdav |
== davfs2 (either as [[wikipedia:Filesystem_in_Userspace|FUSE]] plugin or [[wikipedia:Loadable kernel module|kernel space]] filesystem) == | == davfs2 (either as [[wikipedia:Filesystem_in_Userspace|FUSE]] plugin or [[wikipedia:Loadable kernel module|kernel space]] filesystem) == | ||
| + | davfs2 is available as a Debian/Ubuntu package, so it's easy to install with apt-get install davfs2: | ||
| + | $ sudo apt-get install davfs2 | ||
| + | |||
| + | Once installed, you can connect via the commandline straight away, if you have sudo access: | ||
| + | |||
| + | sudo mount -t davfs http://webdav.example.com/directory /mnt/ | ||
| + | |||
| + | This will mount the specified WebDAV share at /mnt. You'll be asked for the username and password to connect with, if the share is secured. When you're done, unmount with | ||
| + | |||
| + | sudo umount /mnt | ||
| + | |||
| + | This isn't entirely convenient, though; it's better to be able to mount the directory as a normal user. Edit | ||
| + | |||
| + | /etc/fstab | ||
| + | |||
| + | to set up a mountpoint by adding a line like this: | ||
| + | |||
| + | http://webdav.sara.nl /home/juliet/mnt/webdav davfs rw,noauto,user 0 0 | ||
| + | |||
| + | You'll need to create the mountpoint with | ||
| + | |||
| + | mkdir -p /home/juliet/mnt/webdav | ||
| + | |||
| + | if it doesn't already exist. | ||
| + | |||
| + | If you try running mount | ||
| + | |||
| + | /home/juliet/mnt/webdav | ||
| + | |||
| + | now, as a non-root user, you'll be told that /sbin/mount.davfs is not setuid root. Fix this by running | ||
| + | |||
| + | sudo dpkg-reconfigure davfs2 | ||
| + | |||
| + | and answering 'yes' to the setuid question. You'll also need to add your user to the davfs group (either | ||
| + | |||
| + | edit /etc/group | ||
| + | |||
| + | or use | ||
| + | |||
| + | sudo gpasswd -a username davfs | ||
| + | |||
| + | Log out and in again to update the group information. | ||
| + | |||
| + | Now try mount ~/mnt/webdav again. | ||
| + | |||
== cadaver (an interactive command line client) == | == cadaver (an interactive command line client) == | ||
| + | Cadaver is an open-source, command-line, WebDAV client for UNIX. Connect to a WebDAV server with Cadaver by specifying a URL argument after the main Cadaver program name: | ||
| + | |||
| + | bash$ https://webdav.sara.nl | ||
| + | |||
| + | When you want to do something only a privileged user can do, such as add, move, or rename content, Cadaver will prompt you for a user name (<username>@<domain>.nl) and password. | ||
| + | |||
| + | After you start Cadaver, you can display a list of available commands by typing help on the command line. Some commands relevant to content management, include: | ||
| + | |||
| + | Upload a file | ||
| + | put filename | ||
| + | Download a file | ||
| + | get filename | ||
| + | Upload multiple files at once | ||
| + | mput common* | ||
| + | Where common is the part of the filename that all files being uploaded have in common. For example, to upload all files with names that start with hr, such as hr_benefits, hr_policies, hr_forms, the command would be: | ||
| + | mput hr* | ||
| + | Download multiple files at once | ||
| + | mget common* | ||
| + | Create a folder | ||
| + | mkcol new_folder_name | ||
| + | Delete a folder | ||
| + | rmcol folder_name | ||
| + | Rename a file | ||
| + | move filename new_filename | ||
| + | Move a file | ||
| + | move filename folder_name | ||
| + | Copy a file | ||
| + | copy filename new_filename | ||
| + | Delete a file | ||
| + | delete filename | ||
| + | Lock a file | ||
| + | lock filename | ||
| + | Unlock a file | ||
| + | unlock filename | ||
| + | Invoke help | ||
| + | help | ||
| + | |||
== curl (a command line client) == | == curl (a command line client) == | ||
| + | |||
| + | |||
| + | Share your data [[BeeHub/Step3|step 3]] | ||
Latest revision as of 12:48, 27 October 2011
Mounting BeeHub on your PC
After you've completed step 1 (getting an account), a new BeeHub account has been created for you, and you should have received an email with a username and password. If you haven’t, something has gone wrong and you should contact us.
What happens next depends on which operating system you're running. Please jump to the appropriate section on this page. If your favorite operating system or client is not on this page, please let us know.
Microsoft Windows
Vista and Windows 7 build-in clients
1. Open "Computer" from the "start" menu.
2. Right click on your mouse
3. Click on "Add a Network Location"
4. Continue XP build-in client (below) to #3
XP build-in client and below
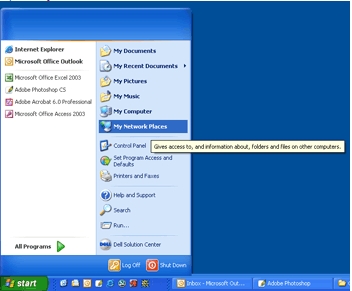
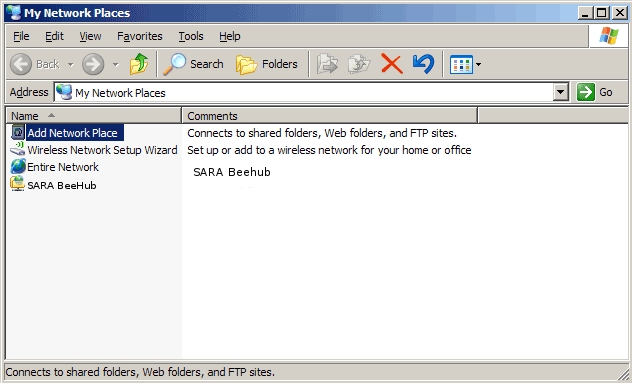
1. Click "Start", and then "My Network Places":
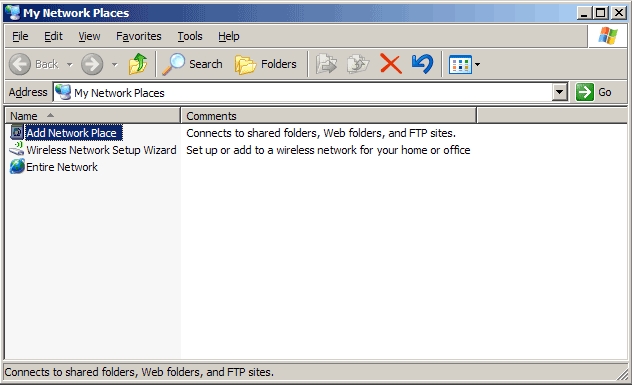
2. Click "Add Network Place":
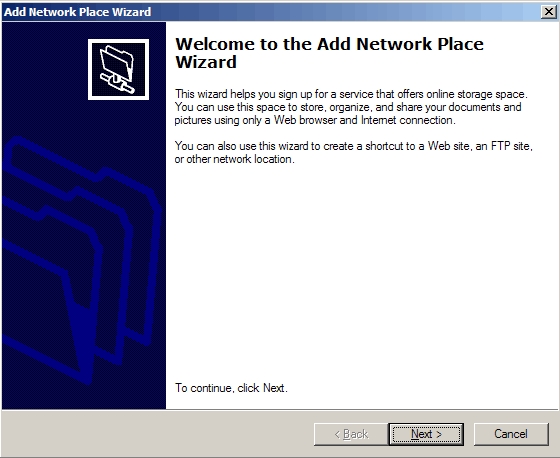
3. Click "Next":
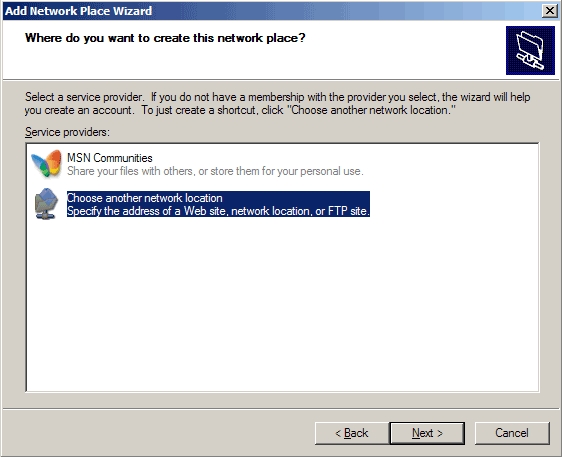
4. Select "Choose another network location" and click "Next"
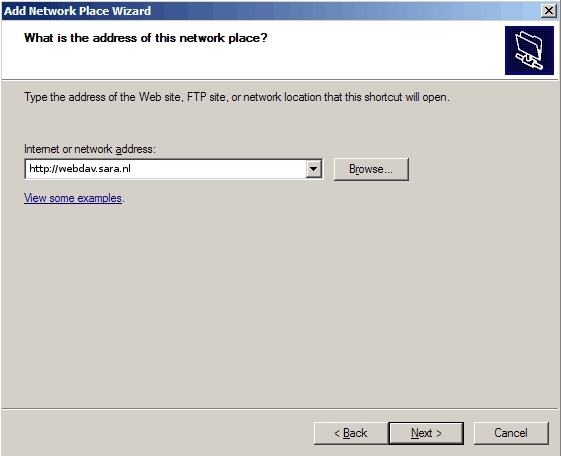
5. Enter the http://webdav.sara.nl (HTTP) or https://webdav.sara.nl (HTTPS) and then click "Next":
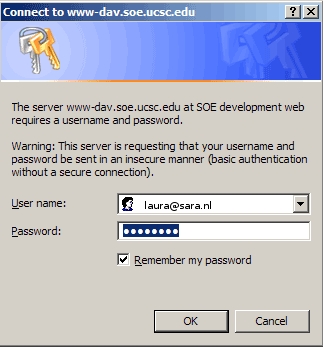
6. Enter your BeeHub user name and password and click "OK":
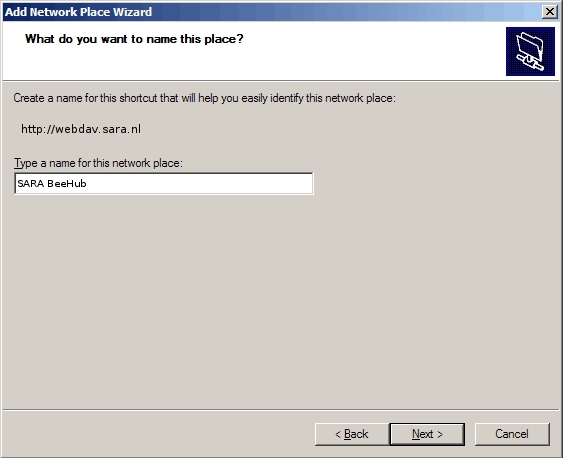
7. Enter a name for your BeeHub connection. The default is probably fine, but you can call the connection anything you like:
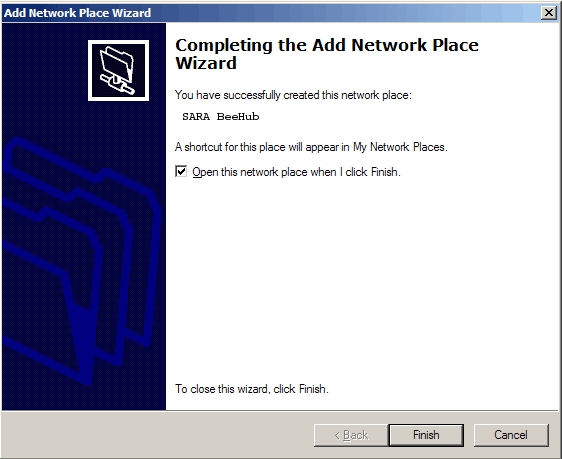
8. Click "Finish":
You now have created a BeeHup connection.
Click "Start", and then "My Network Places" to connect the next time.
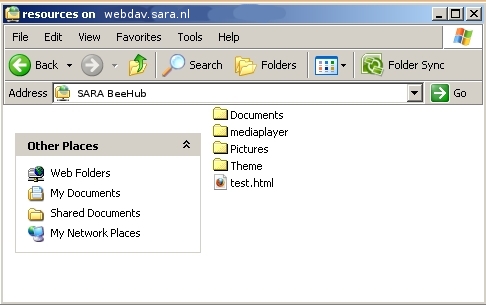
Double click your BeeHub connection:
Now you can browse your files:
OS-X
OS-X build-in client
Linux
Nautilus (Gnome file browser)
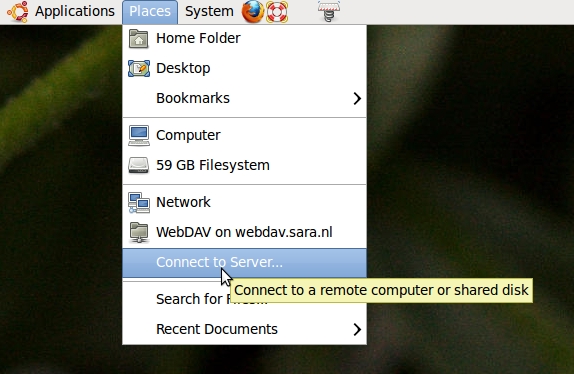
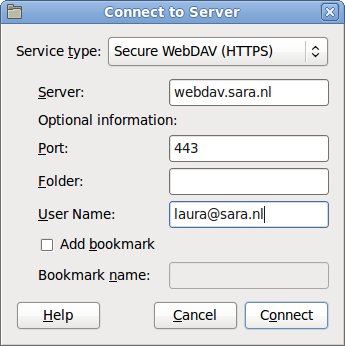
At the topbar choose Places->Connect to server...:
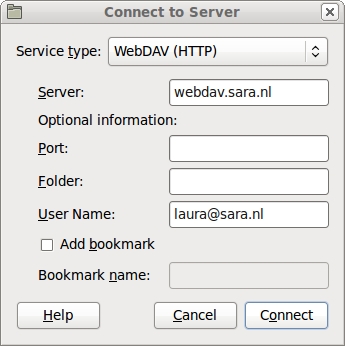
Connect with http or https. User name should be <beehup_username>@<domain>.nl:
With https the port number is 443:
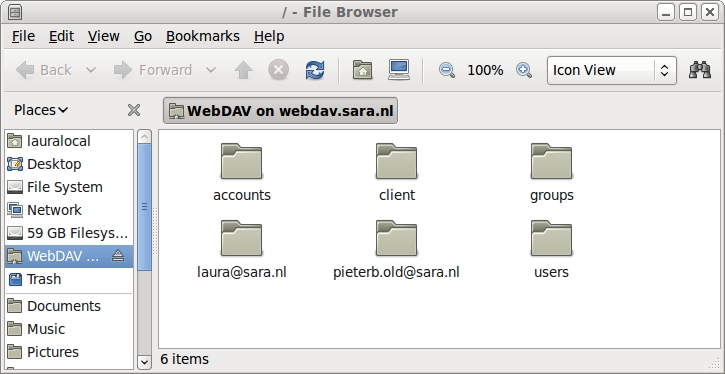
Now you can browse to your files:
Dolphin or Konqueror (KDE4 file browser)
1. Enter remote:/ into the navigation bar in Dolphin or Konqueror.
2. Click “Add Network Folder”
3. You then have a choice of webdav, ftp, Microsoft Windows network drive, or ssh. Choose the one you want.
4. Enter the connection name, server, username, and password information as requested.
5. Click “Save & Connect”.
wdfs (a FUSE plugin)
Mounting WebDAV filesystems (using wdfs)
All the steps must be done as root.
Firstly make sure you have the FUSE (Filesystem in Userspace) files installed, this is simple using yum:
# yum install fuse
Next we need to install the wdfs rpm package:
# yum install wdfs
Next create the mount point:
# mkdir /mnt/webdav
Mounting from the command line
From the README file the usage is very simple:
usage:
$ mkdir ~/mountpoint
$ wdfs http[s]://webdav.sara.nl[:443][/directory/] ~/mountpoint [options]
$ wdfs -h      # prints wdfs and fuse options
So following this the following command mounts the file system (username=<username>@<domain>.nl):
# wdfs http[s]://webdav.sara.nl/ /mnt/webdav -o username=******,password=******,allow_other
The allow_other option is very important as without it only root can view the mounted files. You can leave the
username and/or password out if you wish so you will be prompted for them when you mount the file system.
The remote file system is now mounted, to unmount just do umount /mnt/webdav as you would with any mounted file system.
Mounting using an fstab entry
This is achieved by adding the following line to your /etc/fstab file as root (all on one line):
wdfs#http[s]://webdav.sara.nl/ /mnt/webdav fuse allow_other,uid=0,gid=500,nonempty,username=******,umask=007,locking=simple,noauto
Notice here I have not added the password, this is because the fstab file is world readable so anyone could see your
password. This way you will be prompted for it when you mount the file system. Also as explained above the noauto command
prevents this being mounted at boot (prevents hanging if I'm not connected to the Internet).
To mount the system is now just like any other.
# mount /mnt/webdav
davfs2 (either as FUSE plugin or kernel space filesystem)
davfs2 is available as a Debian/Ubuntu package, so it's easy to install with apt-get install davfs2:
$ sudo apt-get install davfs2
Once installed, you can connect via the commandline straight away, if you have sudo access:
sudo mount -t davfs http://webdav.example.com/directory /mnt/
This will mount the specified WebDAV share at /mnt. You'll be asked for the username and password to connect with, if the share is secured. When you're done, unmount with
sudo umount /mnt
This isn't entirely convenient, though; it's better to be able to mount the directory as a normal user. Edit
/etc/fstab
to set up a mountpoint by adding a line like this:
http://webdav.sara.nl /home/juliet/mnt/webdav davfs rw,noauto,user 0 0
You'll need to create the mountpoint with
mkdir -p /home/juliet/mnt/webdav
if it doesn't already exist.
If you try running mount
/home/juliet/mnt/webdav
now, as a non-root user, you'll be told that /sbin/mount.davfs is not setuid root. Fix this by running
sudo dpkg-reconfigure davfs2
and answering 'yes' to the setuid question. You'll also need to add your user to the davfs group (either
edit /etc/group
or use
sudo gpasswd -a username davfs
Log out and in again to update the group information.
Now try mount ~/mnt/webdav again.
cadaver (an interactive command line client)
Cadaver is an open-source, command-line, WebDAV client for UNIX. Connect to a WebDAV server with Cadaver by specifying a URL argument after the main Cadaver program name:
bash$ https://webdav.sara.nl
When you want to do something only a privileged user can do, such as add, move, or rename content, Cadaver will prompt you for a user name (<username>@<domain>.nl) and password.
After you start Cadaver, you can display a list of available commands by typing help on the command line. Some commands relevant to content management, include:
Upload a file
put filename
Download a file
get filename
Upload multiple files at once
mput common*
Where common is the part of the filename that all files being uploaded have in common. For example, to upload all files with names that start with hr, such as hr_benefits, hr_policies, hr_forms, the command would be:
mput hr*
Download multiple files at once
mget common*
Create a folder
mkcol new_folder_name
Delete a folder
rmcol folder_name
Rename a file
move filename new_filename
Move a file
move filename folder_name
Copy a file
copy filename new_filename
Delete a file
delete filename
Lock a file
lock filename
Unlock a file
unlock filename
Invoke help
help
curl (a command line client)
Share your data step 3
